How to Create and Use a WordPress Staging Site to Safely Test Updates
We know updates are important to maintaining a website, especially those built on WordPress. We also know updates can potentially break your site. When your live site goes down, it can be both time-consuming and expensive to fix—costing you in technical support and lost revenue.
A more effective approach is to test updates on a duplicate of your site that isn’t publicly accessible—a staging site. Because it functions exactly like your live site, any problems that arise can be addressed without disrupting your business or visitors. This controlled environment is the recommended way to implement updates and changes before moving them to your live site.
What is a WordPress Staging Site?
A WordPress staging site is essentially a direct replica of your production site: same content, same plugins, same theme – except it’s a private copy of your website that only you have access to. The major benefit? Having this replica lets you run core, theme, and plugin updates there first, ensuring nothing breaks before publishing the updates live. If you've ever encountered the dreaded ‘white screen of death’ after pressing the update button, you already know why a staging site is so important.
Reasons to Use a Staging Site
A staging website is essential for maintaining a secure and functional WordPress website. Updates often include crucial security patches that fix known WordPress vulnerabilities, but they can also introduce unexpected conflicts. By testing changes—whether they’re WordPress updates, new plugins, themes, or design layouts—in a staging environment, you protect your live site from potential performance issues or disruptions to the visitor experience. By catching and resolving issues in a controlled environment, you avoid costly downtime, broken functionality, and potential revenue loss caused by live site errors.
Beyond troubleshooting, staging sites offer a private space to experiment with new features, designs, or plugin configurations. Here, you can refine your ideas and gather feedback before they go live, ensuring smooth updates and a polished user experience. Incorporating a staging site into your workflow ultimately saves time, minimizes risks, and helps maintain a reliable, user-friendly website.
3 Ways to Create a WordPress Staging Site
There are a lot of ways to set up a WordPress staging site – from one-click solutions to complex developer setups. We’re going to take a look at the 3 common methods and weigh the pros and cons of each, so you can choose the best setup for your technical skill level. Remember, any changes you make on the staging site stay there until you decide to push them live, keeping your production site safe from unintended issues.
When you’re ready to move those changes to your live site, there are three main ways to do it:
Repeat changes manually: Apply the updates or modifications on your staging site, then replicate those same changes on your live site.
Import and export: Make updates on your staging site, then export the changes and import them into your live site.
Full site overwrite: Replace your live site entirely with the staging site. This can be done automatically or manually, depending on your tools and hosting setup.
Below, we’ll cover a few simple WordPress staging site solutions, along with their benefits and drawbacks.
The Hosting Solution: 1-Click Staging
For the most reliable results, host your staging site on the same server as your live website. Matching the hardware and software environment helps avoid unexpected conflicts caused by server differences. Something that works fine on one host may not work on another.
A few managed WordPress hosts, like WPEngine, Kinsta, and SiteGround’s GoGeek plan, offer a free staging site with their hosting provider solutions. This is a great feature that allows you to replicate your live site into a staging environment with one click, make your changes and updates, and then send that version live with another click. This is enormously convenient when you have a live site that undergoes many changes (like a popular eCommerce site). This is by far the easiest and most straightforward solution to setting up a staging site. However, it comes at a cost: only a few hosts offer this, and their hosting fees may be out of budget for some smaller businesses.
Many offer either a full overwrite, which completely replaces your live WordPress site with the staging version, or the option to overwrite just certain sections of your site or even just the database. You are still able to do a manual update too, which keeps staging and live separate.
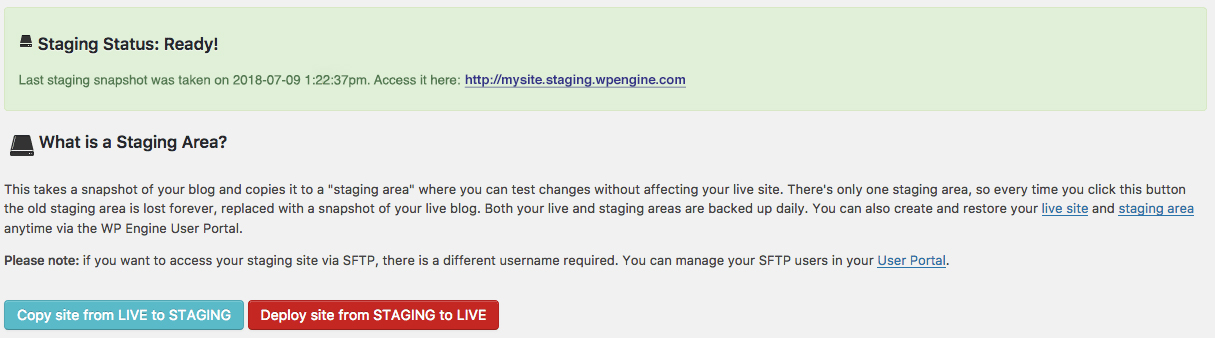
WPEngine’s admin area makes it easy to copy and deploy your staging and live sites – it is done with the push of a button.
The downside is that these hosting plans are more pricey than typical cheap shared hosting, running between $20-$30+ a month. However, having a dedicated WordPress host with features that can really help you manage your site better is a major plus for many businesses.
Pros and Cons of 1-Click Staging
Pros:
Quick and seamless cloning of your live site to a staging site.
Ability to create and destroy staging sites easily.
Hosting environments mirror your live server, minimizing issues.
The easiest way to push changes to your live site.
Cons:
These hosting plans are more expensive than typical shared hosting, costing between $20-$30+ a month.
Requires enough space in your hosting plan to accommodate multiple copies of your site. Larger websites may run out of space.
Available only through certain WordPress-specific hosts.
The Plugin Solution: WPStaging
Not everyone has the ability to change hosts or to pick a host that offers built-in 1-click staging. Another option is to use a plugin to create a staging version directly in your existing WordPress install.
WPStaging is a staging plugin that allows you to create a staging or development environment within your existing live site, right there on your same hosting account. Basically it’s setting up a subdirectory install for you, which is really nice since doing that manually can be complicated.
The WPStaging plugin is available in both free and Pro versions. As expected, the Pro version offers far more functionality and is a pretty cheap investment considering the cost of hiring an hourly developer to fix a broken site.
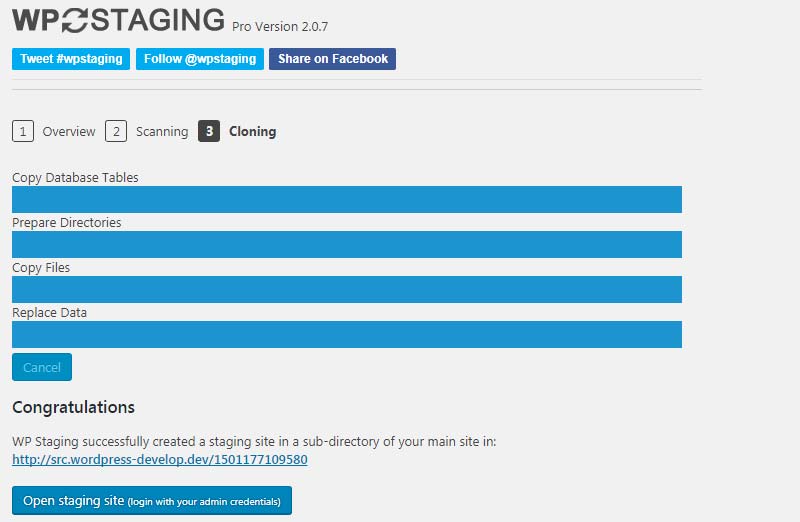
This plugin clones your site into a subfolder or subdomain for staging via cPanel or similar. You then make changes, updates, etc, and push Staging to overwrite Live. It’s an ambitious project being managed by a single person, and has a lot of features that are very impressive and useful for managing a Staging site.
There are some limitations and drawbacks, however – the ability to push your Staging to Live only exists in the Pro version. If you have an altered version of WordPress (this is an advanced topic and doesn’t apply to typical users) you may find some conflicts. The developer is active in the support forums though, which is a good sign that they are putting effort and time into creating a very useful tool. It’s definitely worth reviewing as an alternative to a host-based staging environment.
Pros and Cons of Plugin Solutions
Pros:
Easy to install and use for beginners.
Allows you to create a staging site on your existing hosting account.
The Pro version of WPStaging includes powerful features, such as direct deployment to Live.
Cons:
Some functionality, like pushing staging to live, is locked behind the Pro version.
Limited to your hosting environment and any constraints of your server.
The Local WordPress Site Solution
In the development world, “local” means the site is running on your own computer – not your web host. To do this, you need to install programs on your computer to make your computer function like a server.
It’s standard these days for developers to build websites locally – it runs super fast since you’re not waiting for communication with a remote host every time you change something. However, anyone can use a local site as a duplicate of their live site to test things like a new theme or plugin, for example. There are even a few WordPress-specific solutions that make running a local install super simple for non-developers.
Building a staging site locally also means you are virtually unlimited in how many staging sites you can have. Interested in trying out a membership site? Or a site that is purely a blog? Maybe you are feeling confident in your WordPress powers and want to build a blog for a colleague. You can do this locally, and then push it up to any hosting account when it’s ready.
Local by hosting company Flywheel offers local hosting, but adds on extra developer tools like mirroring live your environment with Apache or Nginx. It also lets you share your local site so others can look at it, or you can test it on other devices. This is great for development reviews, but also comes in handy if you’re just using it as a staging site for testing a new theme – get colleague reviews of it before it goes live!
Local also provides many more options for customizing your development environment and is actively in development to continually add new features all the time. Check out this review of Local by Flywheel over at the WPExplorer blog.
Pros and Cons of Building a Staging Site Locally
Pros:
Runs very fast since it doesn’t rely on remote hosting.
You control your entire environment.
Unlimited WordPress websites, allowing you to do anything you want with them.
WordPress-specific solutions are super quick to install, and allow you to create a fully functioning WordPress site in minutes, or import an existing site.
Cons:
Getting your staging site to your live site can be difficult. Some offer a direct deployment feature, but it doesn’t work with all hosts. You can export to archive, then import the archive to your live site using a plugin and export, but it’s a bit clunky when you need to do this for every update.
As it’s running on your local computer, it’s not fully mirroring your live server. All hosting setups are different, and something that works fine on your local site could break or function differently on Live because of these nuances.
Some computers have restrictions in place that do not allow you to install a server for running your site locally. You will need to have admin access on your computer for it to run.
Staging Sites Aren’t Just for Updates
Many website owners are hesitant to install new plugins or themes—or even run updates—because they don’t want visitors to see changes in progress on their live site. But with a staging site, there’s no need to worry. If you’re curious about experimenting with a new theme or plugin, your staging site is the perfect place to do so. You can add the new theme, configure it, and take it for a real-world test drive, all without affecting your live site. You can even invite others to check it out and give feedback.
The same goes for new features and plugins—vetting them in a staging environment safeguards your live site and lets you work out any kinks before going public. Once everything looks good, you can push the updated staging site live with minimal downtime.
For an extra layer of protection, make sure your WordPress site stays secured from threats before and after updates. Explore SiteLock’s WordPress security services to keep your site protected from vulnerabilities and maintain a secure online presence.