SiteLock Security Plugin Overview
Login Security
Login Security protects your website by enforcing strong authentication practices. This may include features such as two-factor authentication, password complexity requirements, and limiting login attempts.
- Why you need it: It helps prevent unauthorized access, brute-force attacks and account takeovers.
- Impact: Users may need to follow stricter login procedures, but your site is much less likely to be compromised through weak or stolen credentials.
- What it does: It monitors login activity, enforces security rules, and can block suspicious login attempts.
This section lists security features to help protect your WordPress admin login from unauthorized access and weak credentials.
Website Security
Website Security provides comprehensive protection against threats such as malware, vulnerabilities, and unauthorized changes.
- Why you need it: It safeguards your site’s data, reputation, and visitors from cyberattacks.
- Impact: Your site is regularly scanned for threats, and you may receive alerts or automatic remediation for issues found.
- What it does: It scans files and code for malware, checks for vulnerabilities, and monitors for suspicious activity.
This section lists features to help protect your WordPress site from common exploits and vulnerabilities.
> Security Report
The Security Report page provides a detailed view of your website’s protection status, covering site health, login security, website security and available SiteLock cloud services.
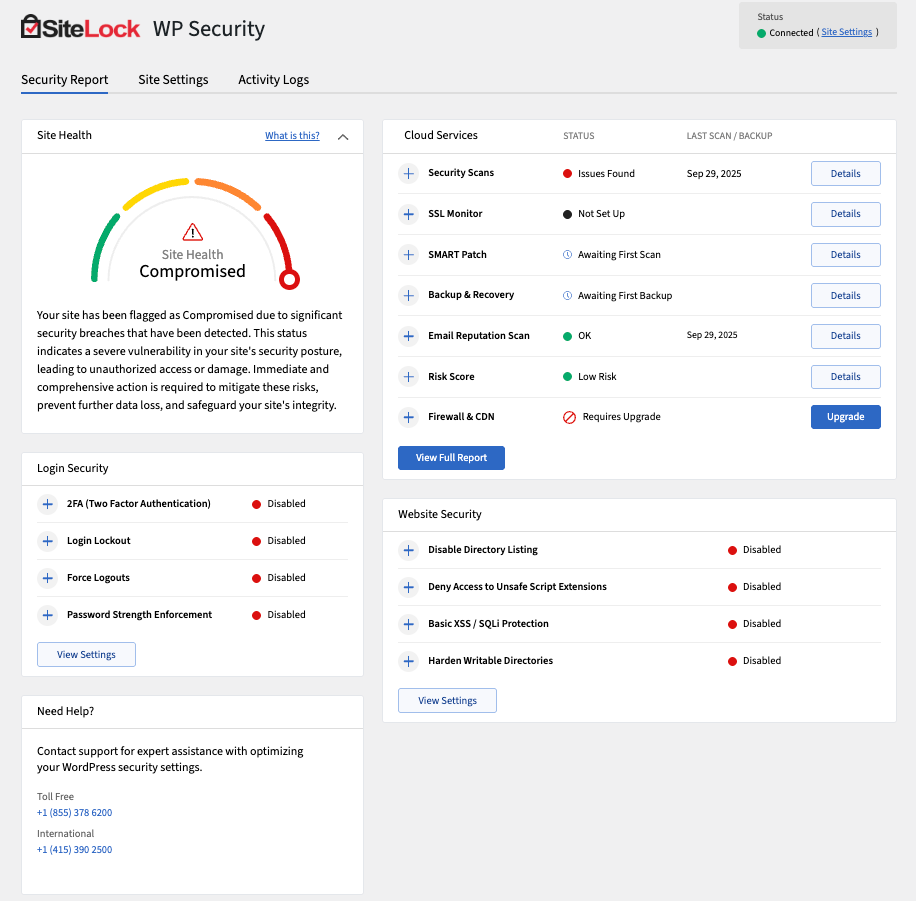
The Security Report page is divided into several panels:
- Site Health — Displays the overall security status of your website.
- Cloud Services — Lists SiteLock’s advanced protection features, which require account activation.
- Login Security — Lists features to protect your WordPress admin login from unauthorized access.
- Website Security — Lists features to help protect your WordPress site from common exploits and vulnerabilities.
- Admin Monitoring Report — Provides a log of recent admin activity and changes.
- Help — Lists SiteLock support contact details.
[ Site Health ]
The Site Health panel shows the real-time status of your website’s security. It measures vulnerabilities, configuration issues and overall protection.
The following describes the details and controls of the Site Health panel.
Requires Activation - Your SiteLock account is not yet activated; health data is unavailable.
Analyzing - SiteLock is scanning your website to identify vulnerabilities.
Health Meter - Displays the overall risk level, and available risk levels are:
- Green — Secure
- Yellow — Warnings
- Red — Issues Found
Activate Free Account - The button activates your free SiteLock account and starts protecting your site.
Compare Plans - The button opens a comparison of SiteLock plans and features.
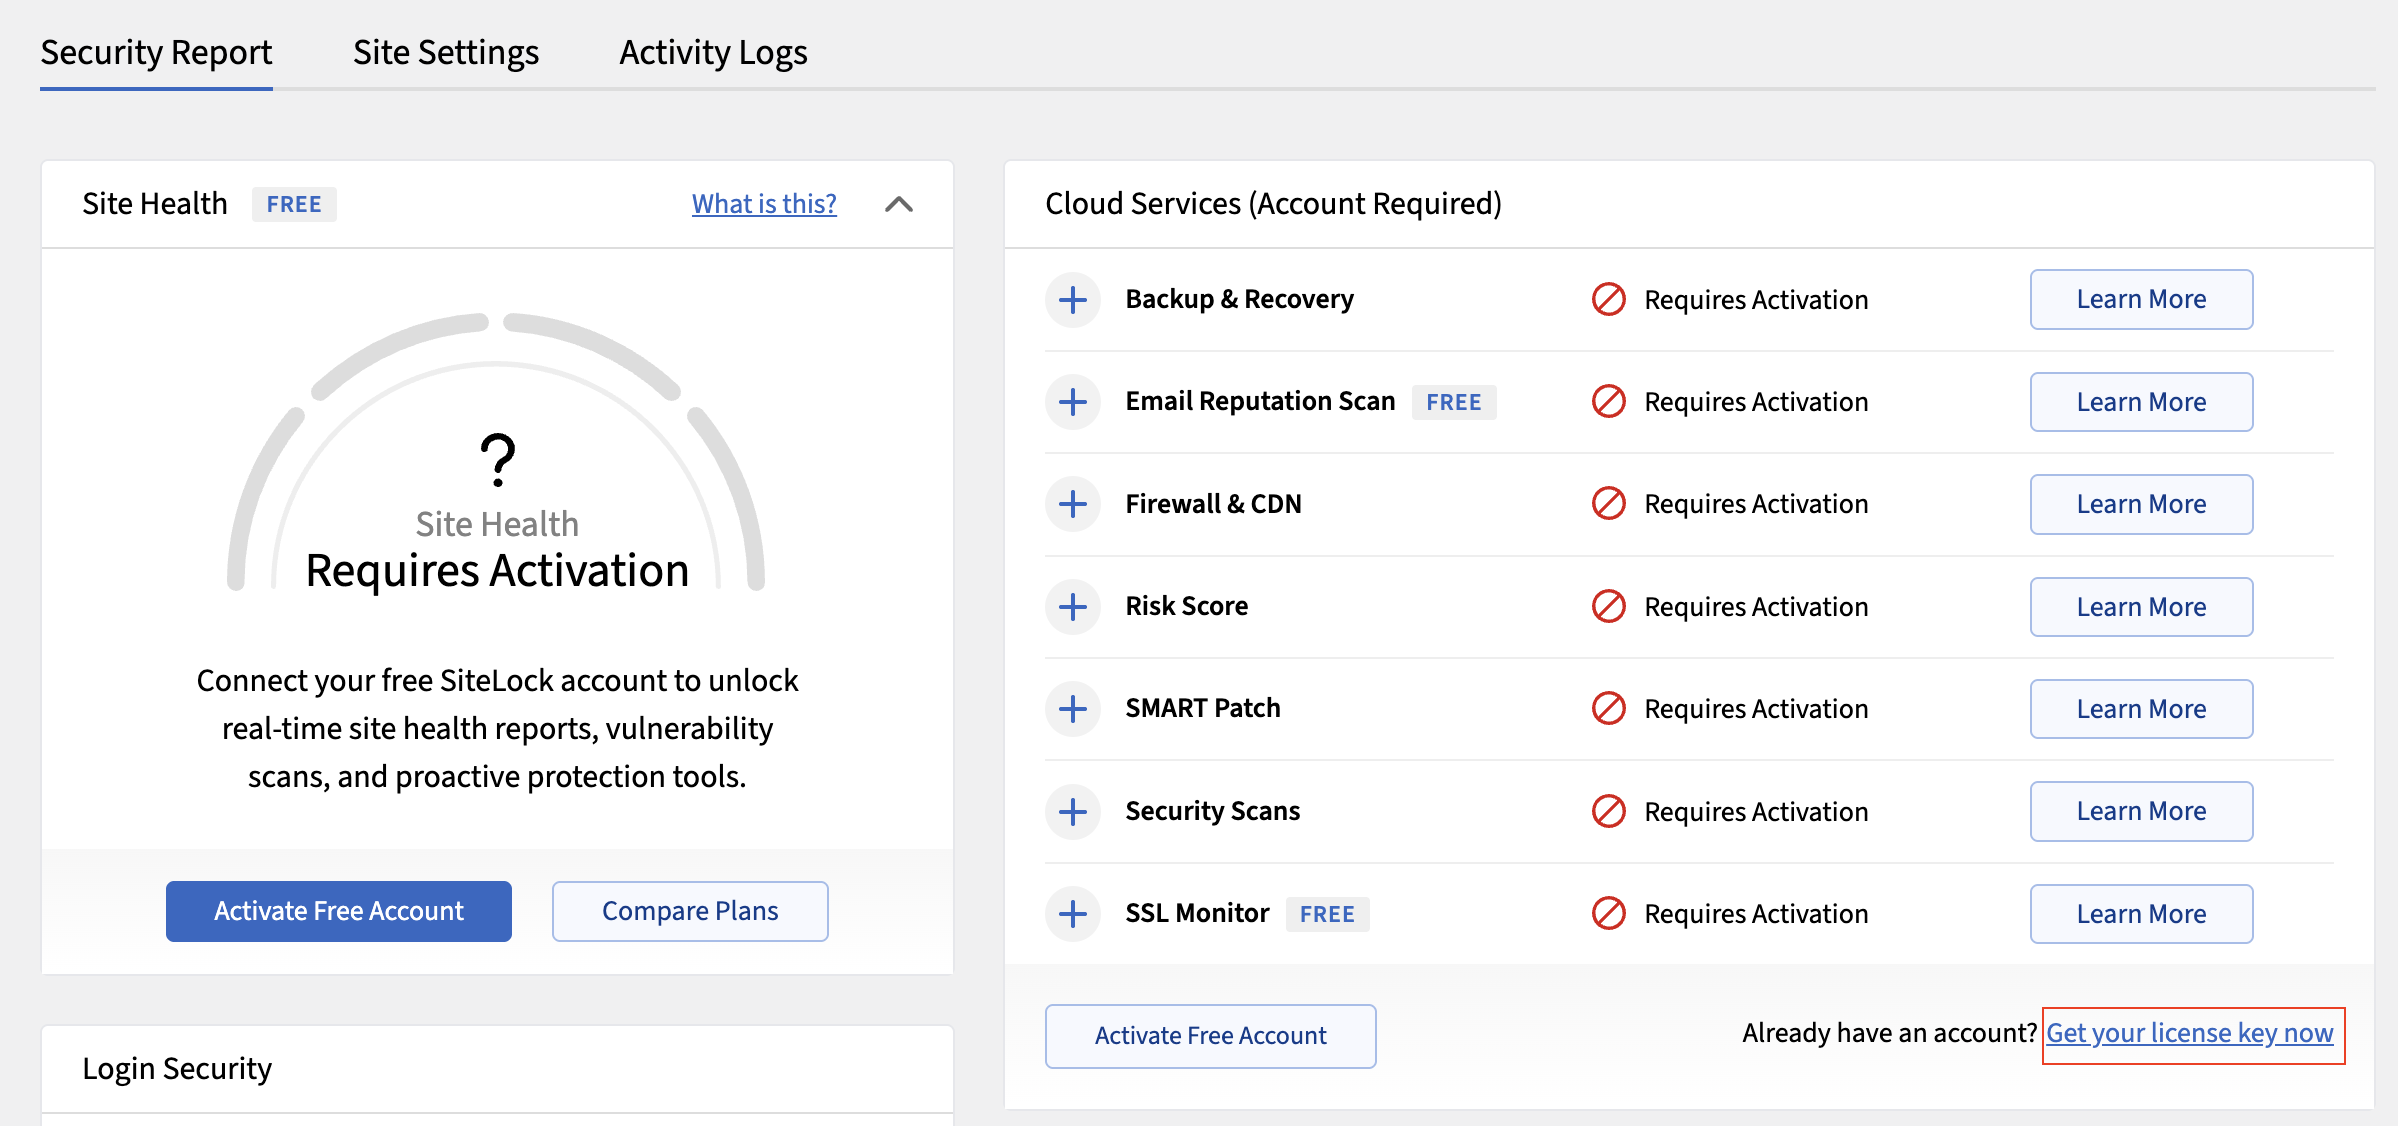
[ Cloud Services ]
The Cloud Services panel lists advanced SiteLock features. Activation or upgrade may be required. To read more about each service, click Learn More.
The following describes the details and controls of the Cloud Services panel.
CMS Patching - Automatically applies patches to CMS vulnerabilities.
If you have a free SiteLock account, you can upgrade it by clicking Upgrade.
Email Reputation - Monitors and improves your domain’s email sending reputation.
Firewall/CDN - Provides a website firewall and content delivery network for speed and protection.
If you have a free SiteLock account, you can upgrade by clicking Upgrade.
Security Scanning - Includes malware, database, and file scans to detect threats.
Site Backup - Provides automated site backups with restore options.
If you have a free SiteLock account, you can upgrade by clicking Upgrade.
SSL Monitoring - Monitors your SSL certificates for validity and expiration.
Status - Shows the current status of each service, and available statuses are:
- Requires Activation — Service is not active (if you don’t have an account).
- Requires Upgrade — Service requires a paid plan; upgrade your account.
- Awaiting first scan — Service is active; initial scan pending.
After activation the free plan, the status may change to:
- OK — No issues found.
- Warning — Minor issues detected.
- Issue Found — Significant issues detected.
- Failed Scan — Scan could not complete.
- Not set up — Service not configured.
If you do not have a SiteLock account, the following actions are available:
- Pick a Plan — The Pick a Plan button allows you to choose a paid SiteLock plan to access advanced cloud services. To activate specific services such as CMS Patching, Firewall/CDN, or Site Backup, you must select and purchase a suitable SiteLock plan. Once you have an active paid plan, these services can be activated and managed from the Cloud Services section.
- Activate Free Account — The Activate Free Account button allows you to create and activate a free SiteLock account to start protecting your website with basic security features.
- Get your license key now — The Get your license key now link helps you retrieve your SiteLock license key if you have already purchased a plan but do not have the key.
If you have activated a free SiteLock account, the following actions are available:
- Upgrade — The Upgrade button allows you to upgrade your free SiteLock account to a paid plan to access advanced cloud services such as CMS Patching, Firewall/CDN, and Site Backup. Clicking the Upgrade button will take you to the SiteLock website, where you can choose and purchase a suitable paid plan. Once you have an active paid plan, you can activate and manage these services from the Cloud Services section.
- View Full Report — The View Full Report button opens a detailed security report for your website, providing insights into vulnerabilities, threats, and overall site health.
- Download Full Report — The Download Full Report button allows you to download a full security report for your website in PDF format, which you can save and share as needed.
[ Login Security ]
The Login Security panel lists security features to help protect your WordPress admin login from unauthorized access and weak credentials.
- All Login Security settings are free regardless of an account.
The following describes the details and controls of the Login Security panel:
2FA (Two Factor Authentication) - Adds an extra verification step to the login process.
Login Lockout - Blocks users after repeated failed login attempts.
Force Logouts - Automatically logs out users after a set time for better security.
Password Strength Enforcement - Requires users to create strong passwords.
Status - Shows whether each feature is activated or deactivated, and available statuses are:
- Disabled — Indicates the feature is inactive.
- Enabled — Indicates the feature is active.
[ Website Security ]
The Website Security panel lists features that help protect your WordPress site from common exploits and vulnerabilities.
- All Website Security settings are free regardless of an account.
The following table describes the details and controls of the Website Security panel:
Disable Directory Listing - Prevents attackers from browsing files in directories.
Deny Access to Unsafe Script Extensions - Blocks access to potentially dangerous script file types.
Basic XSS/SQLi Protection - Blocks basic cross-site scripting and SQL injection attempts.
Harden Writable Directories - Restricts write permissions on sensitive directories to prevent unauthorized changes.
View Settings - Opens the Website Security settings page to configure options.
Status - Shows whether each feature is activated or deactivated, and available statuses are:
- Disabled — Indicates the feature is inactive.
- Enabled — Indicates the feature is active.
[ Help ]
The Help panel provides SiteLock support contact details.
The following describes the contact methods available in the Help panel.
- Toll Free +1 (855) 378 6200
- International +1 (415) 390 2500
Support Portal - Submit a ticket through the SiteLock dashboard.
> Site Settings
The Site Settings page allows you to configure the SiteLock WordPress plugin to suit your website’s security needs. You can manage various security features, including login protection, website hardening, and admin monitoring.
[ SiteLock Plan & License ]
The SiteLock plan & license tab displays your current SiteLock plan and license status.
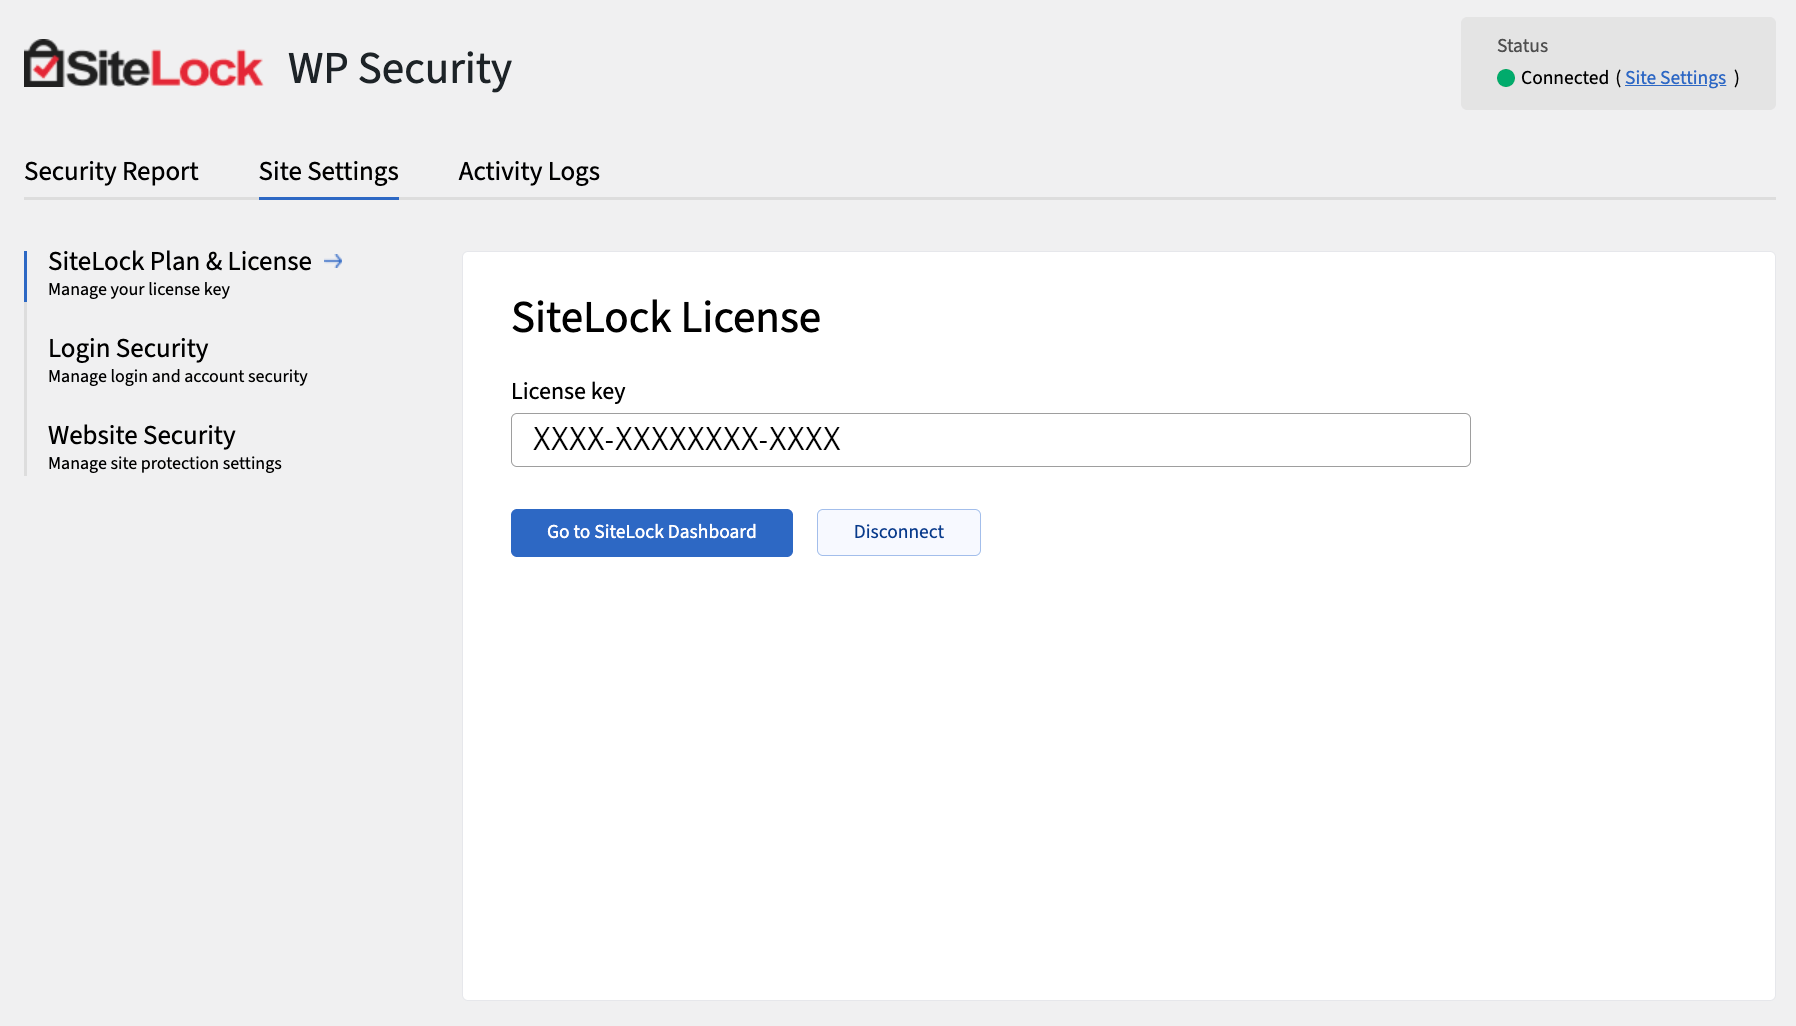
How to configure your SiteLock plan & license
- Navigate Settings > SiteLock Plan & License.
- Enter your license key (If you do not have a license key, click Get your license key now.)
- Click Save Changes to activate your SiteLock account.
Once activated, your eligible plan features will load the latest data and your license status will display 'Connected' on the top right of the plugin page.
[ Website Security ]
The Website Security tab allows you to configure various security settings for your WordPress site.
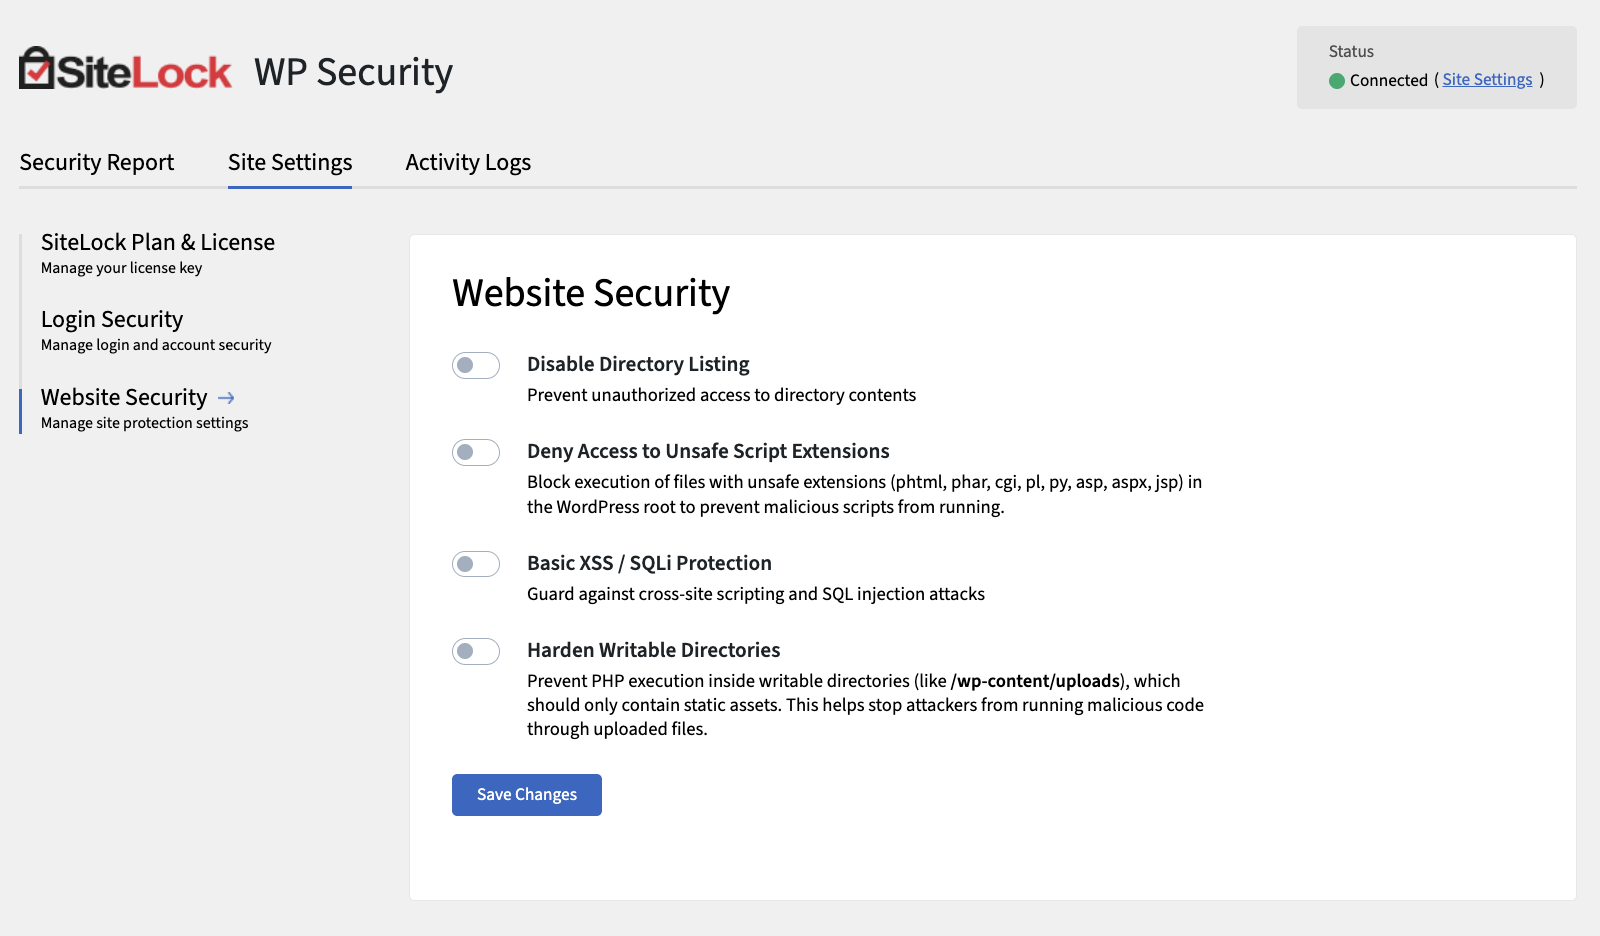
The following describes the details of the Website Security tab:
Disable Directory Listing - Prevents unauthorized users from viewing the contents of directories on your server when a default index file is not present.
Deny Access to Unsafe Script Extensions - Blocks access to potentially unsafe script file types.
Basic XSS/SQLi Protection - Provides basic protection against cross-site scripting (XSS) and SQL injection (SQLi) attacks.
Harden Writable Directories - Strengthens security for directories that are writable by the web server, reducing the risk of unauthorized access.
[ Login security ]
The Login Security tab provides multiple levels of enforcement for password strength, allowing you to tailor security requirements to your site’s needs.
Password strength is evaluated using the industry-standard open-source tool zxcvbn, which analyzes passwords for complexity and resistance to common guessing techniques. This ensures that users create passwords that are difficult to hack.
There are three enforcement levels for password strength:
- Disabled — No password strength requirements are enforced.
- Medium — Passwords must meet a moderate level of complexity, as determined by zxcvbn (typically requiring a mix of characters and a minimum length).
- Strong — Passwords must achieve a high strength score in zxcvbn, requiring longer passwords with a greater variety of character types.
You can specify the minimum required password strength for each user role, ensuring that higher-privileged accounts (such as Administrators) have stricter requirements.
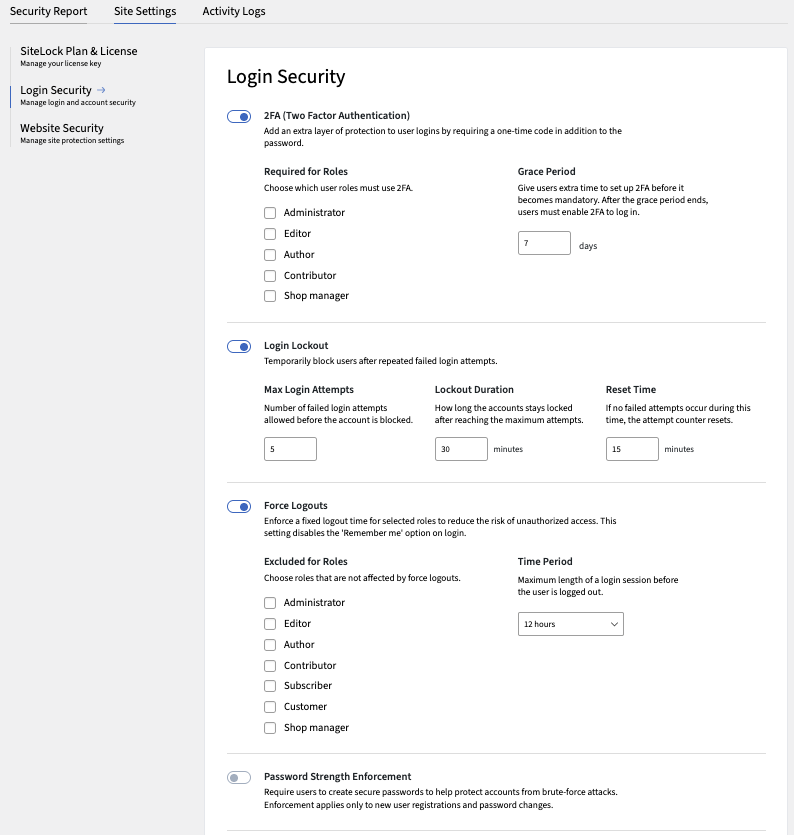
The following describes the details and controls of the Login Security tab:
Two-Factor Authentication (2FA) - Adds an extra layer of security by requiring a second form of verification during login. If this feature is activated, the Your 2FA tab will appear.
Require for Roles - Specifies which user roles are required to use 2FA. Check the boxes next to the roles you want to enforce 2FA for.
The possible roles are:
- Administrator
- Editor
- Author
- Contributor
- Shop manager
Grace Period - Specifies a grace period during which users can log in without 2FA after enabling the feature. By default, this is set to 7 days.
Login Lockout - Temporarily locks out users after a specified number of failed login attempts.
- Max Login Attempts — Specifies the maximum number of failed login attempts allowed before a user is locked out.
- Lockout Duration — Specifies the duration (in minutes) for which a user is locked out after exceeding the maximum login attempts.
- Reset Time — Specifies the time period (in minutes) after which the failed login attempt count is reset.
Force Logouts - Automatically logs out users after a specified period of inactivity to enhance security.
- Excluded for Roles — Specifies which user roles are exempt from forced logouts. The possible roles are:
- Administrator
- Editor
- Author
- Contributor
- Subscriber
- Customer
- Shop manager
Time Period — Specifies the duration (in hours) of inactivity after which users are automatically logged out.
Password Strength Enforcement - Requires users to create strong passwords that meet specific complexity requirements.
- Minimum Strength by Role — Specifies the minimum password strength required for different user roles. The possible roles are:
- Administrator
- Editor
- Author
- Contributor
- Subscriber
- Customer
- Shop manager
Password Strength Levels — Defines the levels of password strength (Disabled, Medium, Strong) based on criteria such as length and character variety.
Login Activity Log - Tracks and logs login attempts, alerting you to suspicious activity.
- Enable for Roles — Specifies which user roles have their login activity logged. The possible roles are:
- Administrator
- Editor
- Author
- Contributor
- Subscriber
- Customer
- Shop manager
Log Retention Period — Specifies how long login activity logs are retained before being automatically deleted.
> Activity Logs
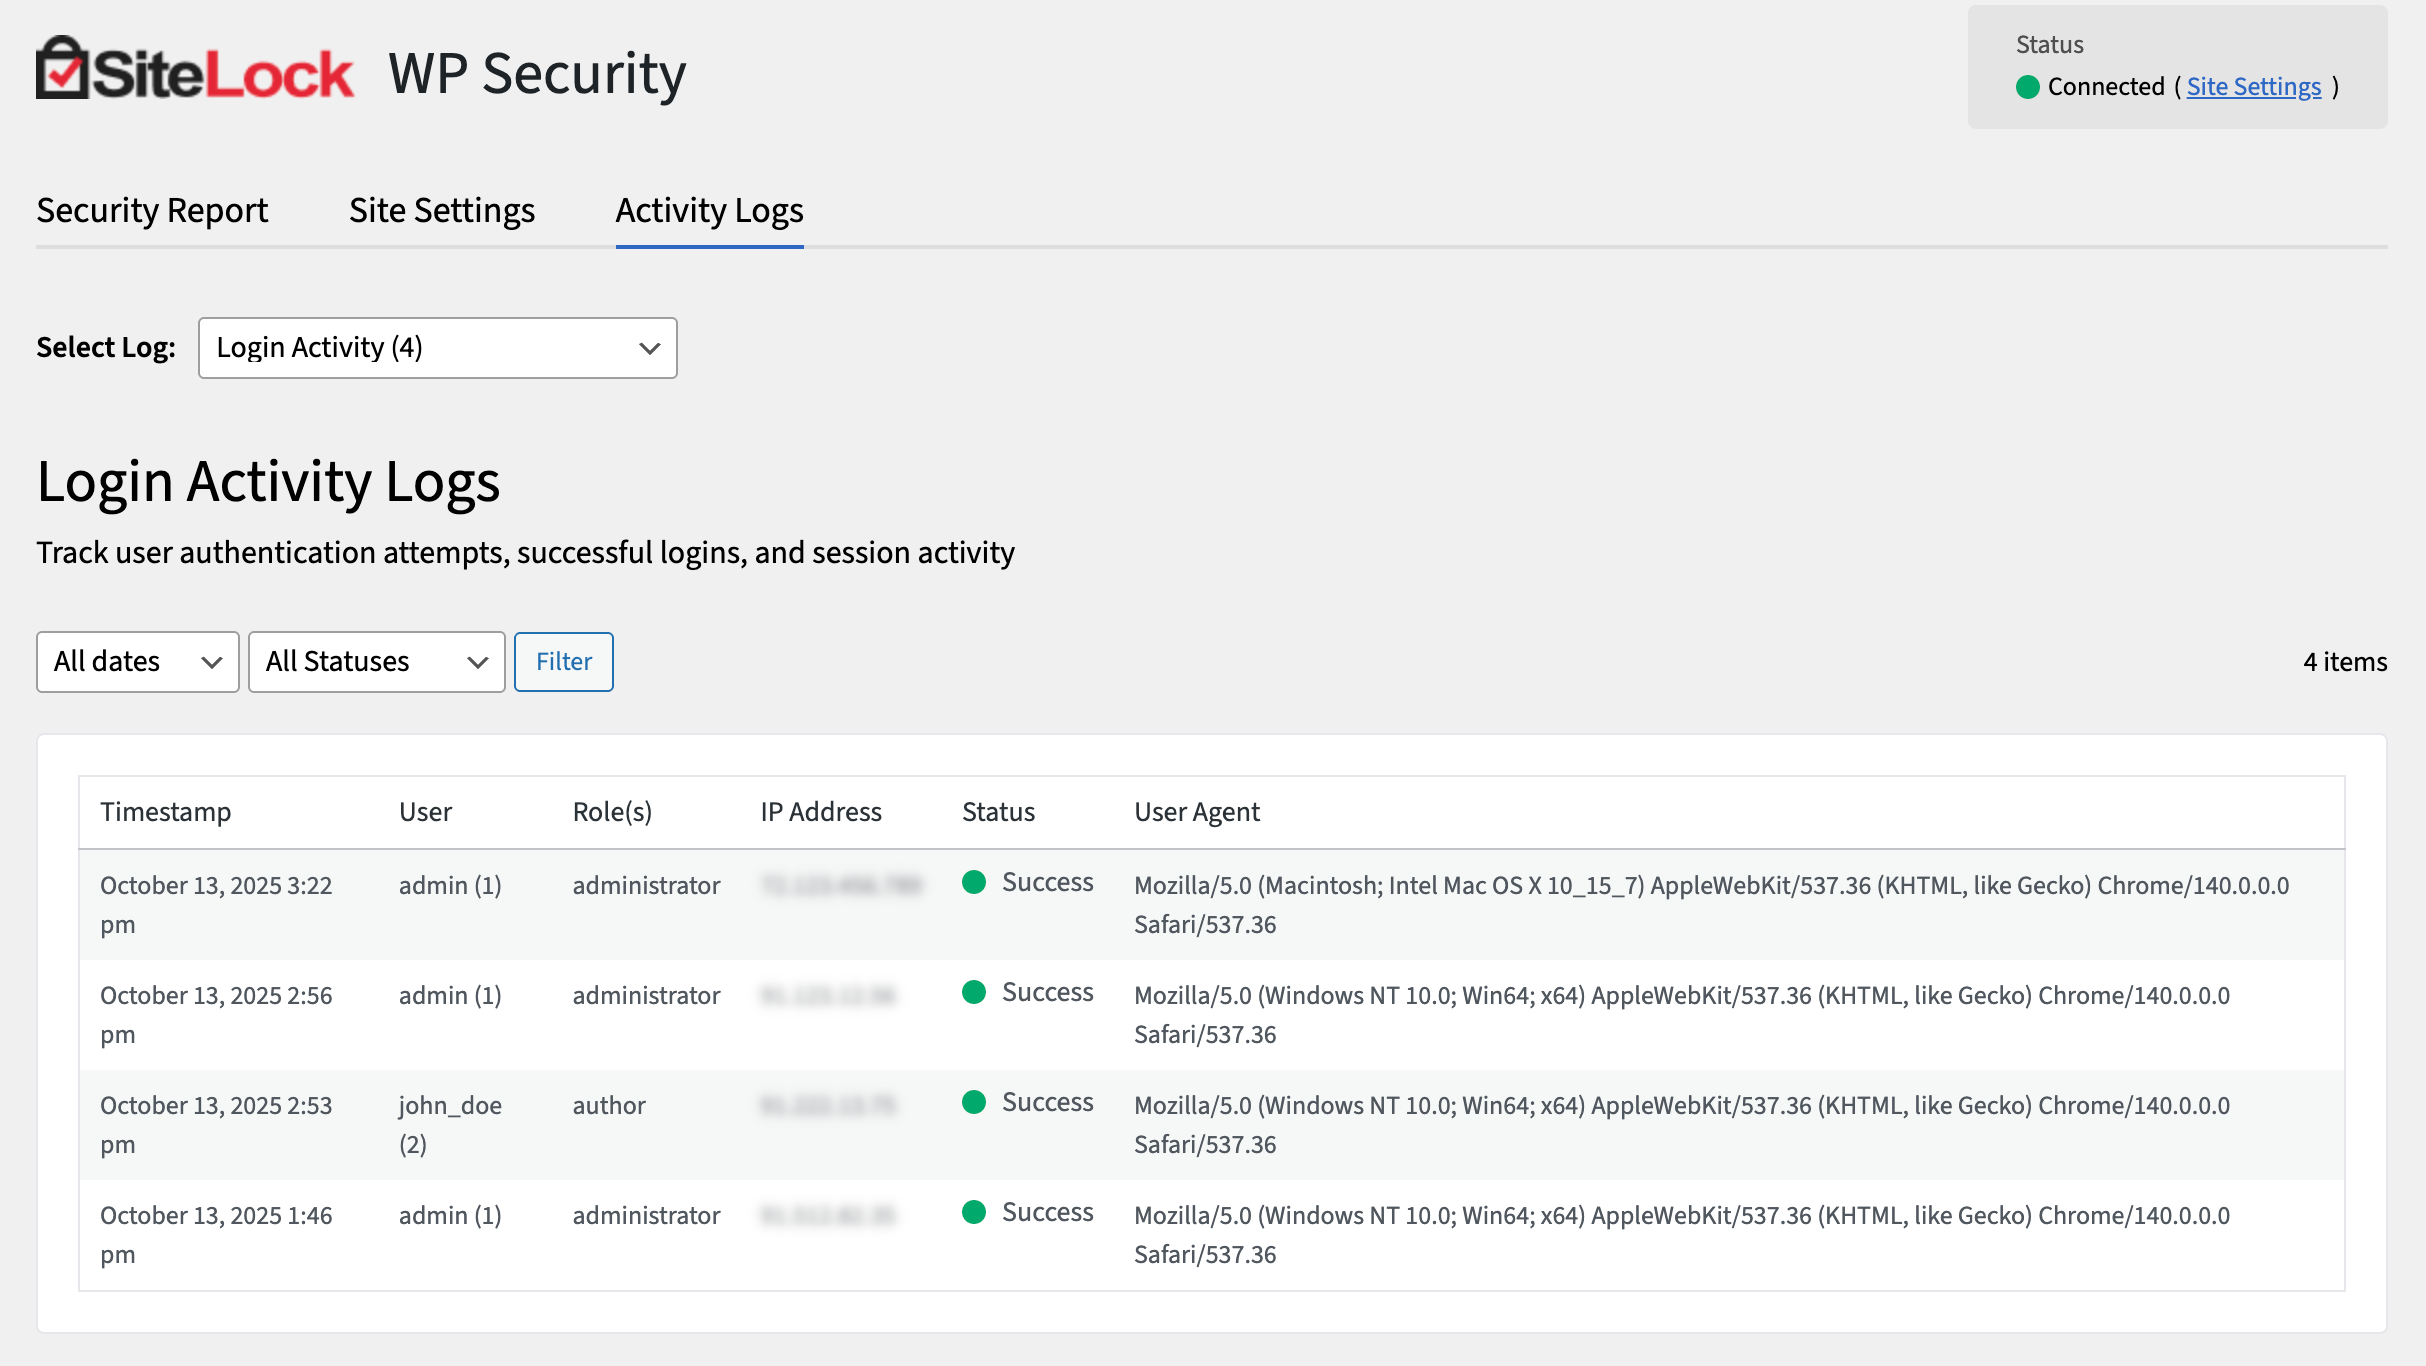
The Activity Logs page provides a detailed record of all login attempts to your WordPress admin area. This includes successful logins, failed attempts and other relevant information such as IP addresses and timestamps.
How to view Login Activity Logs
- Navigate to the Activity Logs tab.
- Locate the Login Activity Logs section.
- Select a log from the list to view more details.
- Review the list of login attempts, including details such as timestamps, user IDs, and IP addresses.
[ Login Activity Logs ]
The following describes the details and controls of the Login Activity Logs page:
Timestamp - The date and time when the login attempt occurred.
User ID - The ID of the account that was used for the login attempt.
Username - The username that was used for the login attempt.
Roles - The roles assigned to the user account that was used for the login attempt.
IP Address - The IP address from which the login attempt originated.
Status - The result of the login attempt, and available results are:
Successful — The login attempt was successful.
Failed — The login attempt failed.
All — Show all login attempts.
Date range - Filter logs by a specific date range. Available ranges are:
- All dates
- Last 7 days
- Custom range (select start and end dates)
Status - Filter logs by status, and available statuses are: * Success * Failure * All Statuses
Filter - Apply the selected filters to the log list.
[ Admin Audit Logs ]
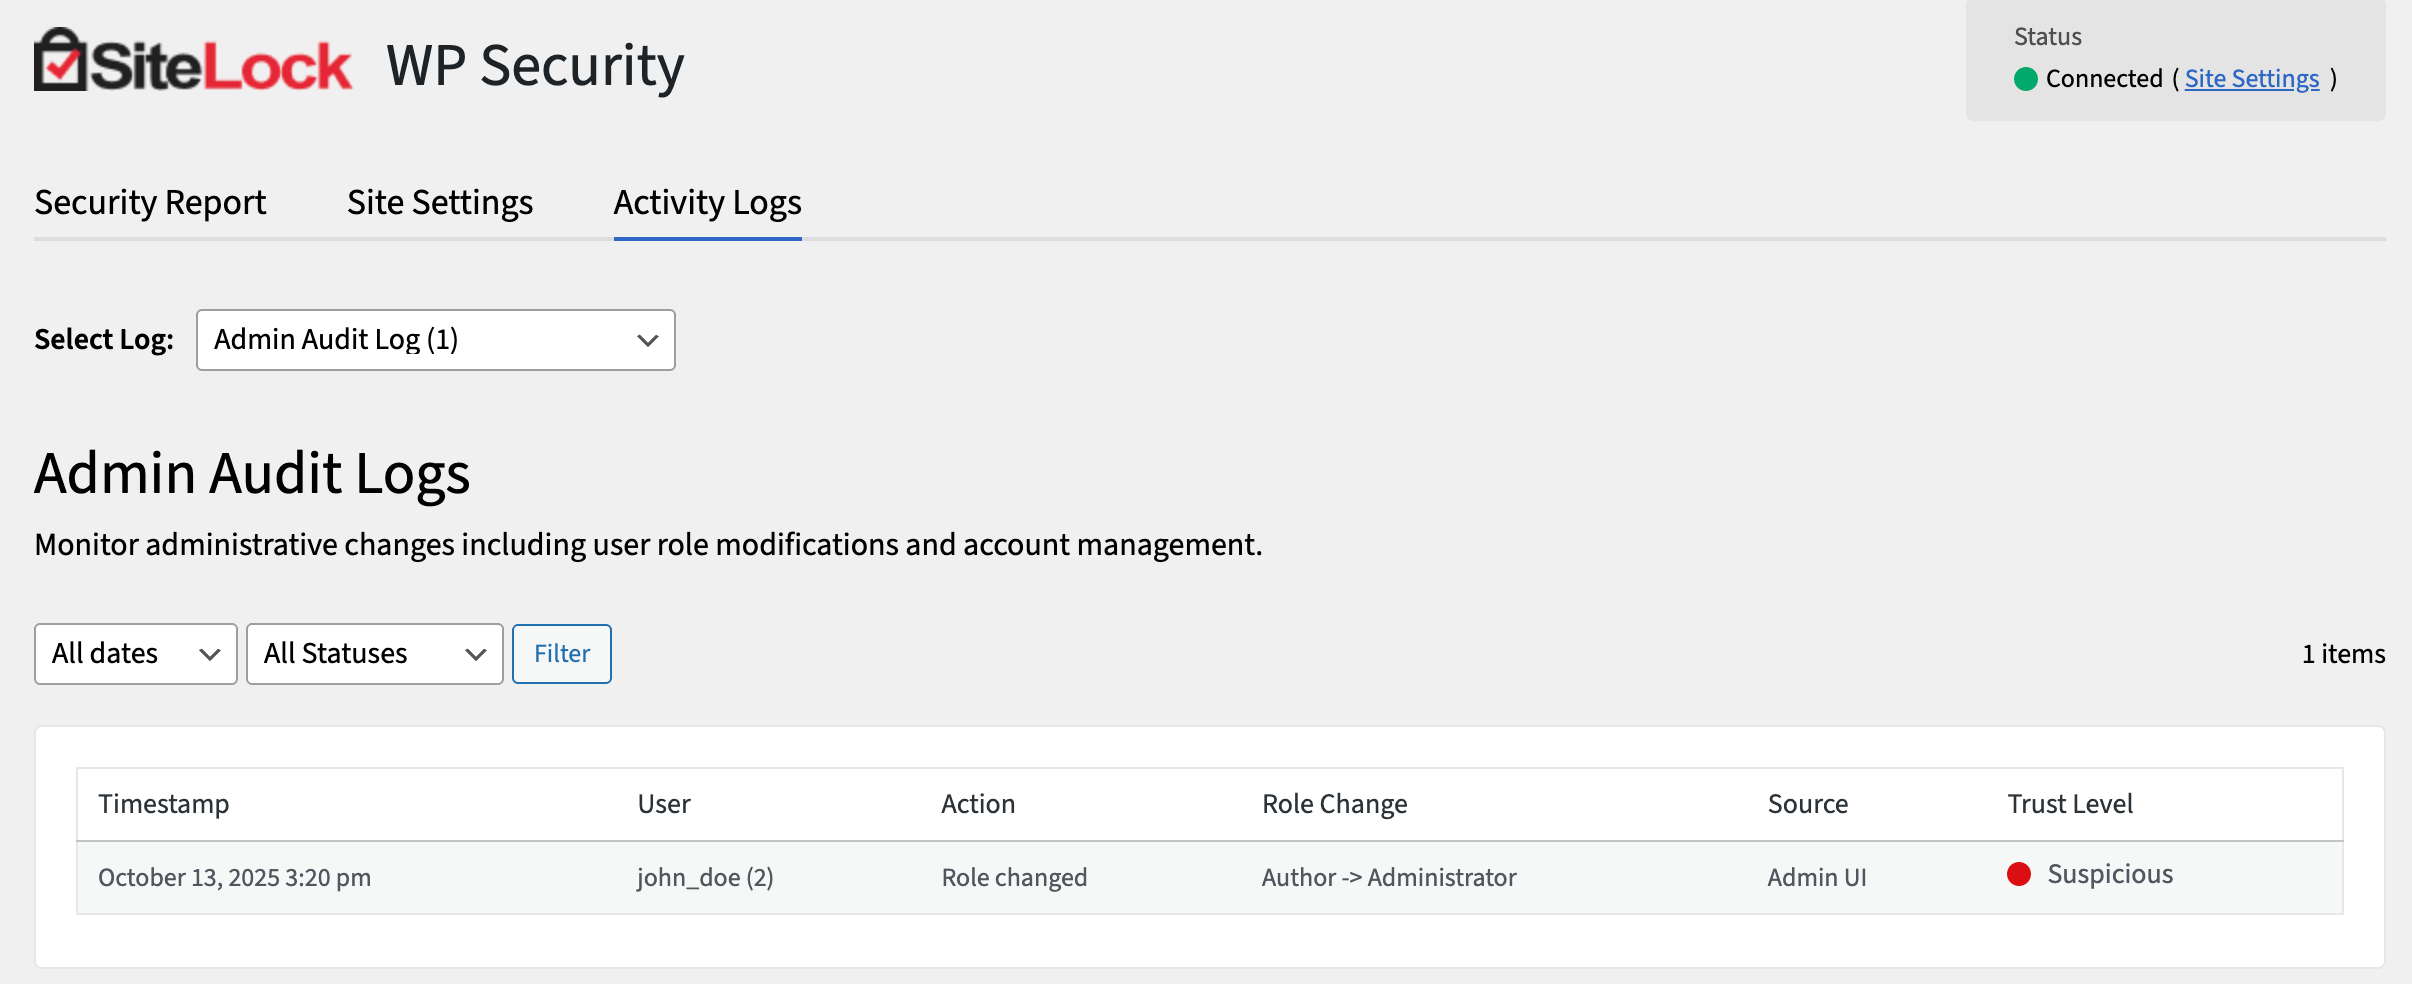
The Admin Audit Logs section provides a record of significant administrative actions taken on your WordPress site, such as changes to settings, plugin installations and user management.
How to view Admin Audit Logs
- Navigate to the Activity Logs tab.
- Select log from the list to view more details.
- Review the list of admin actions, including details such as timestamps, user IDs, and action types.
[ Admin Audit Logs ]
The following table describes the details and controls of the Admin Audit Logs section.
Timestamp - The date and time when the admin action occurred.
User - The username of the admin who performed the action.
Action - The type of the admin action that was performed.
Source - The source or location where the action was initiated.
Date range - Filter logs by a specific date range, and available ranges are:
- All dates
- Last 7 days
- Custom range (select start and end dates)
Status - Filter logs by status, and available statuses are:
- Success
- Failure
- All Statuses
Filter - Apply the selected filters to the log list.
> Your 2FA
The Your 2FA page allows you to manage your two-factor authentication (2FA) settings for enhanced login security.
This page is only visible if "2FA" under Login Security is enabled.
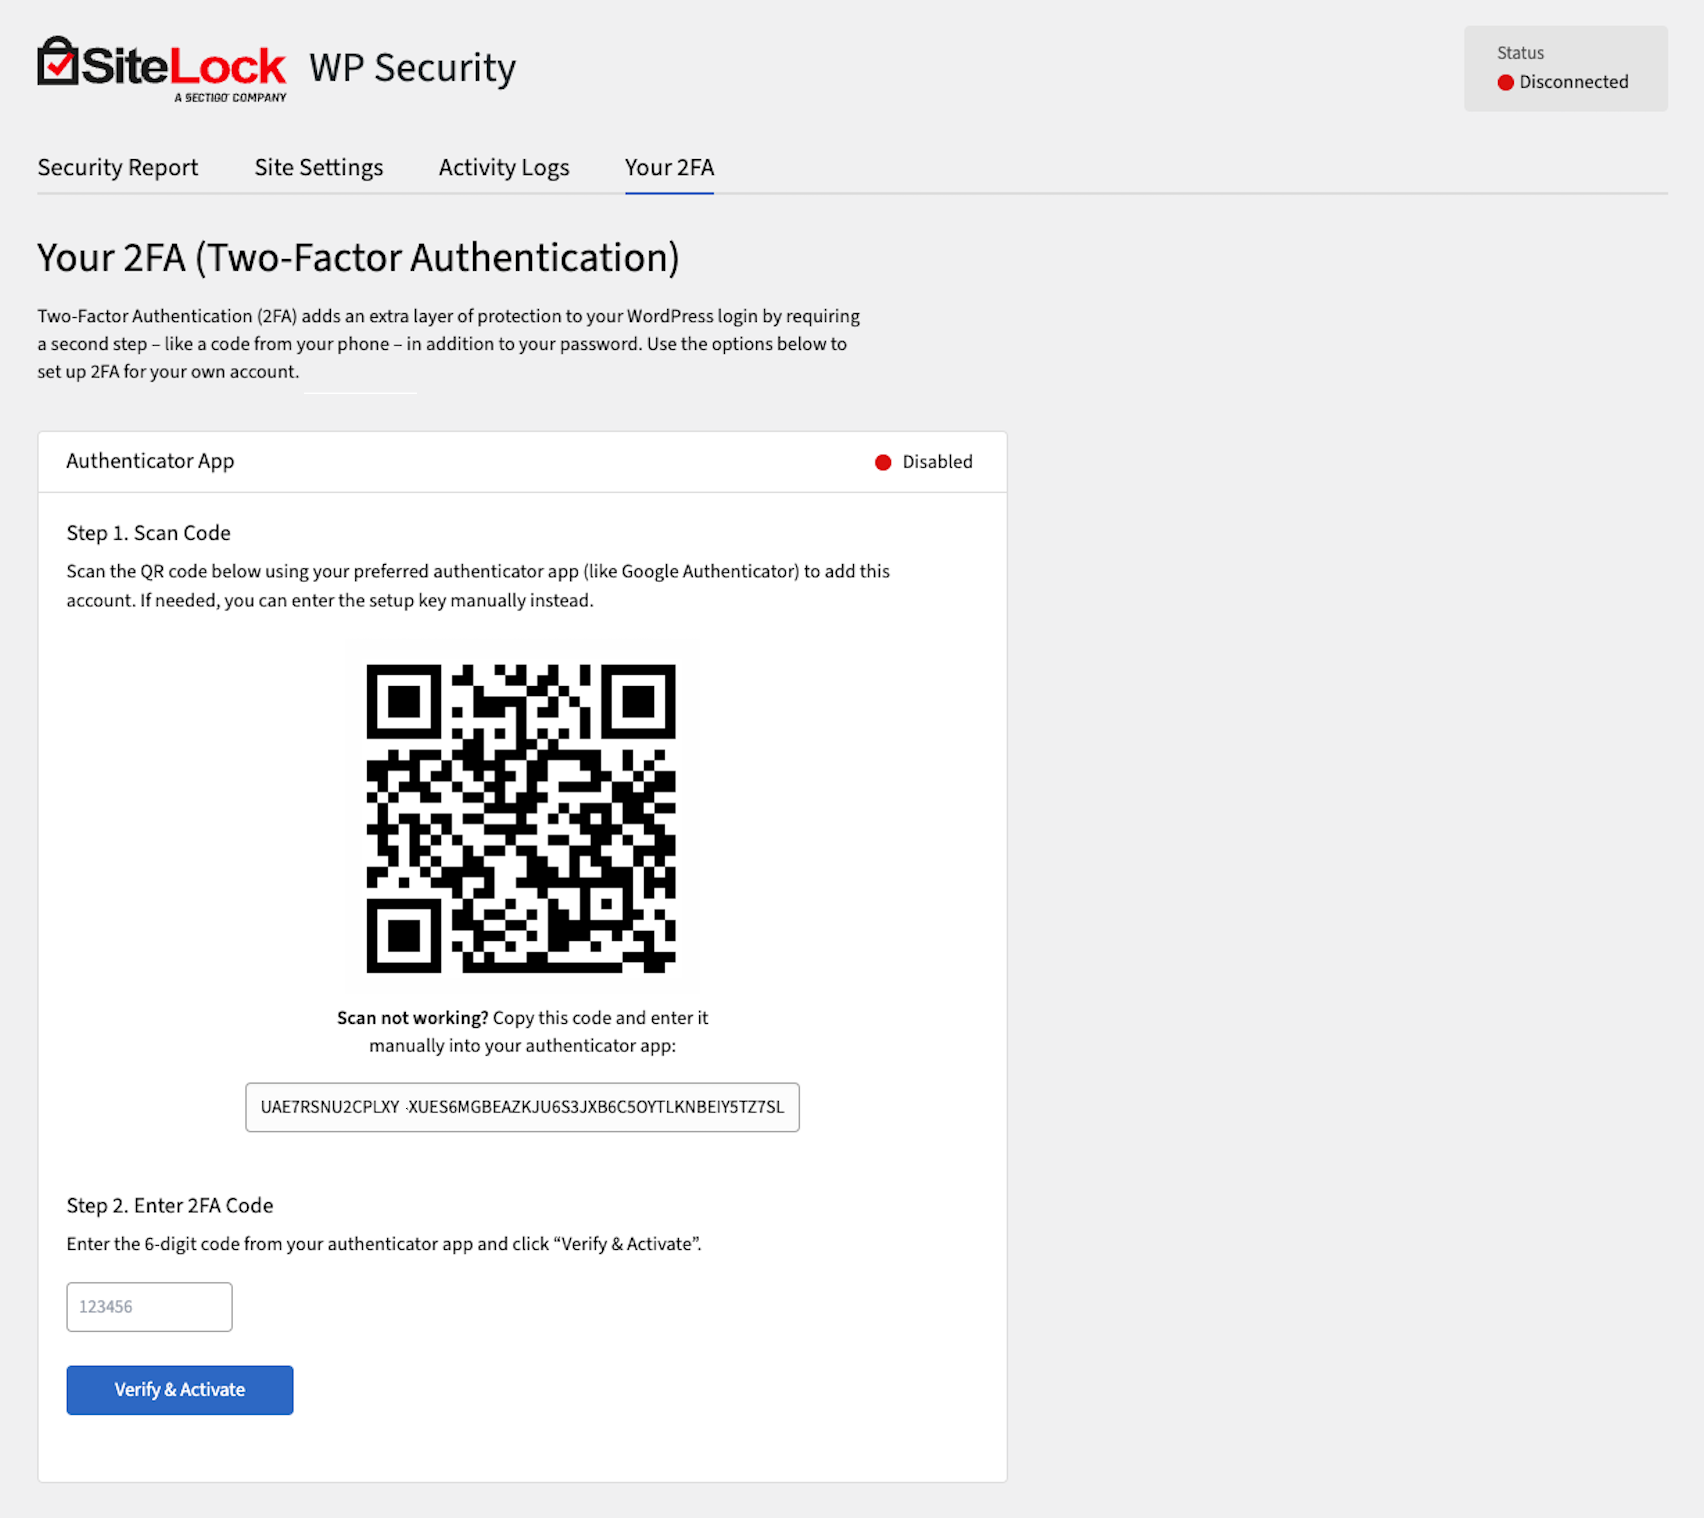
[ How to configure Your 2FA settings ]
- Navigate to the Your 2FA tab.
- Download and install an authenticator app on your mobile device (e.g., Google Authenticator, Authy).
- Scan the QR code displayed on the Your 2FA page using your authenticator app.
- Enter the 6-digit code generated by the authenticator app into the Verification Code field.
- Click Verify & Activate to activate two-factor authentication for your account.
Download recovery codes after you activate 2FA, in case you lose access to your authenticator app!
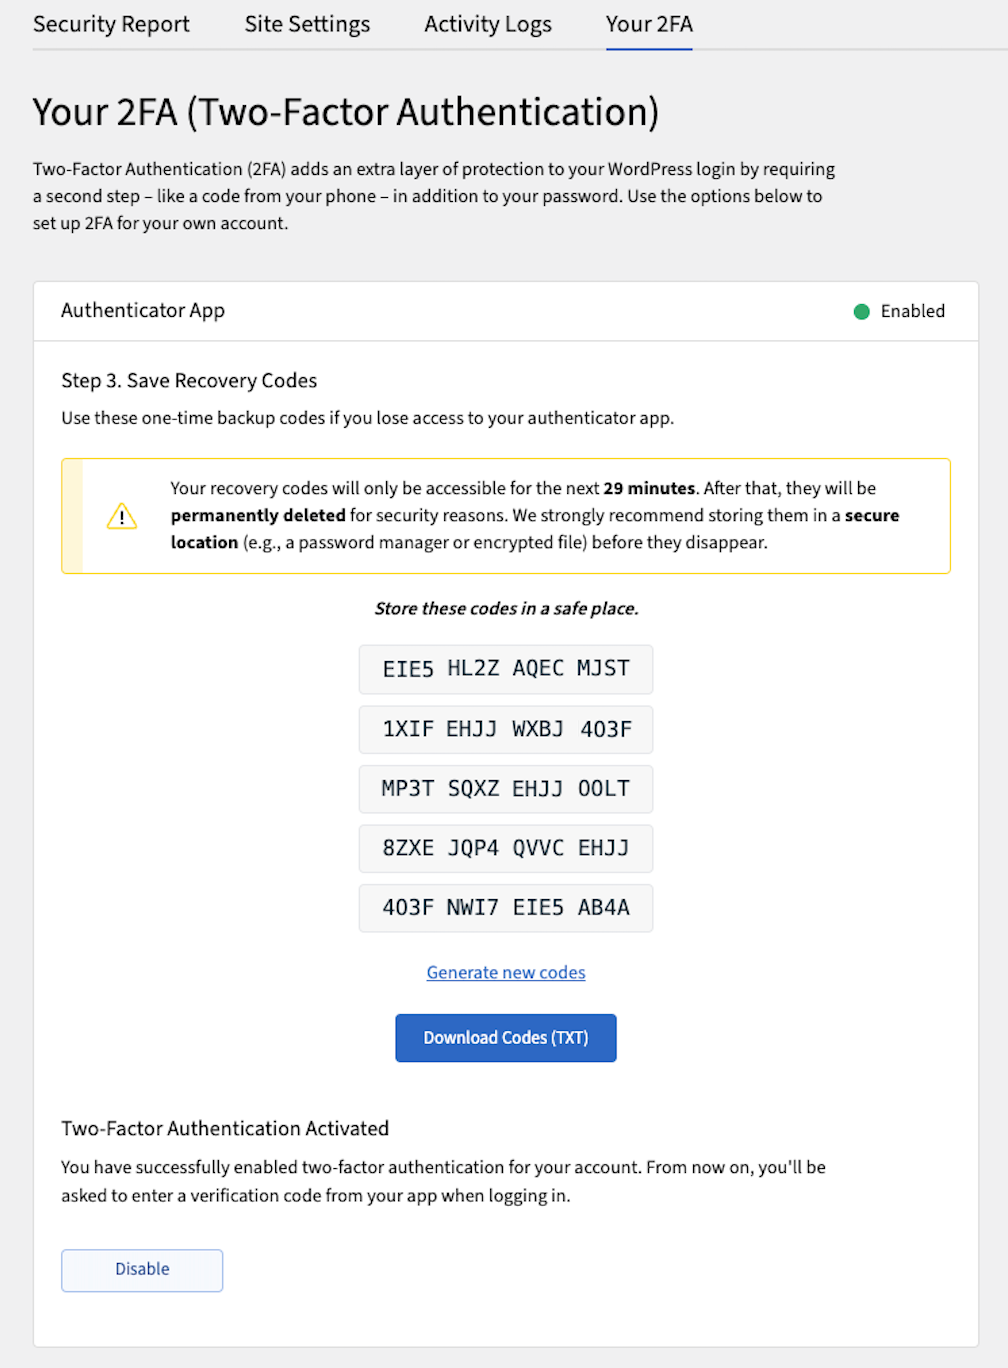
Once activated, you will be prompted to enter a 2FA code from your authenticator app each time you log in to your WordPress admin area.
[ How to deactivate Your 2FA ]
- Navigate to the Your 2FA tab.
- Click Disable.
- Confirm the deactivation.
How can we help with your website security?

Reduce your website security risks
Get started with SiteLock today
SiteLock quickly removes threats, restores functionality, and helps prevent future attacks, all backed by continuous monitoring and support.
